Components Backrest, Replacing
Components Backrest, Replacing
Special Tools: 115 8962
The illustrations in this service information are used for different model years and/or models. Some variation may occur. However, the essential information in the illustrations is always correct.
Removing The Backrest Padding
Remove the seat.
Removing The Front Seat Adjustment Knobs
Remove the side panel.
Removing The Adjustment Knob From The Lumbar Support:
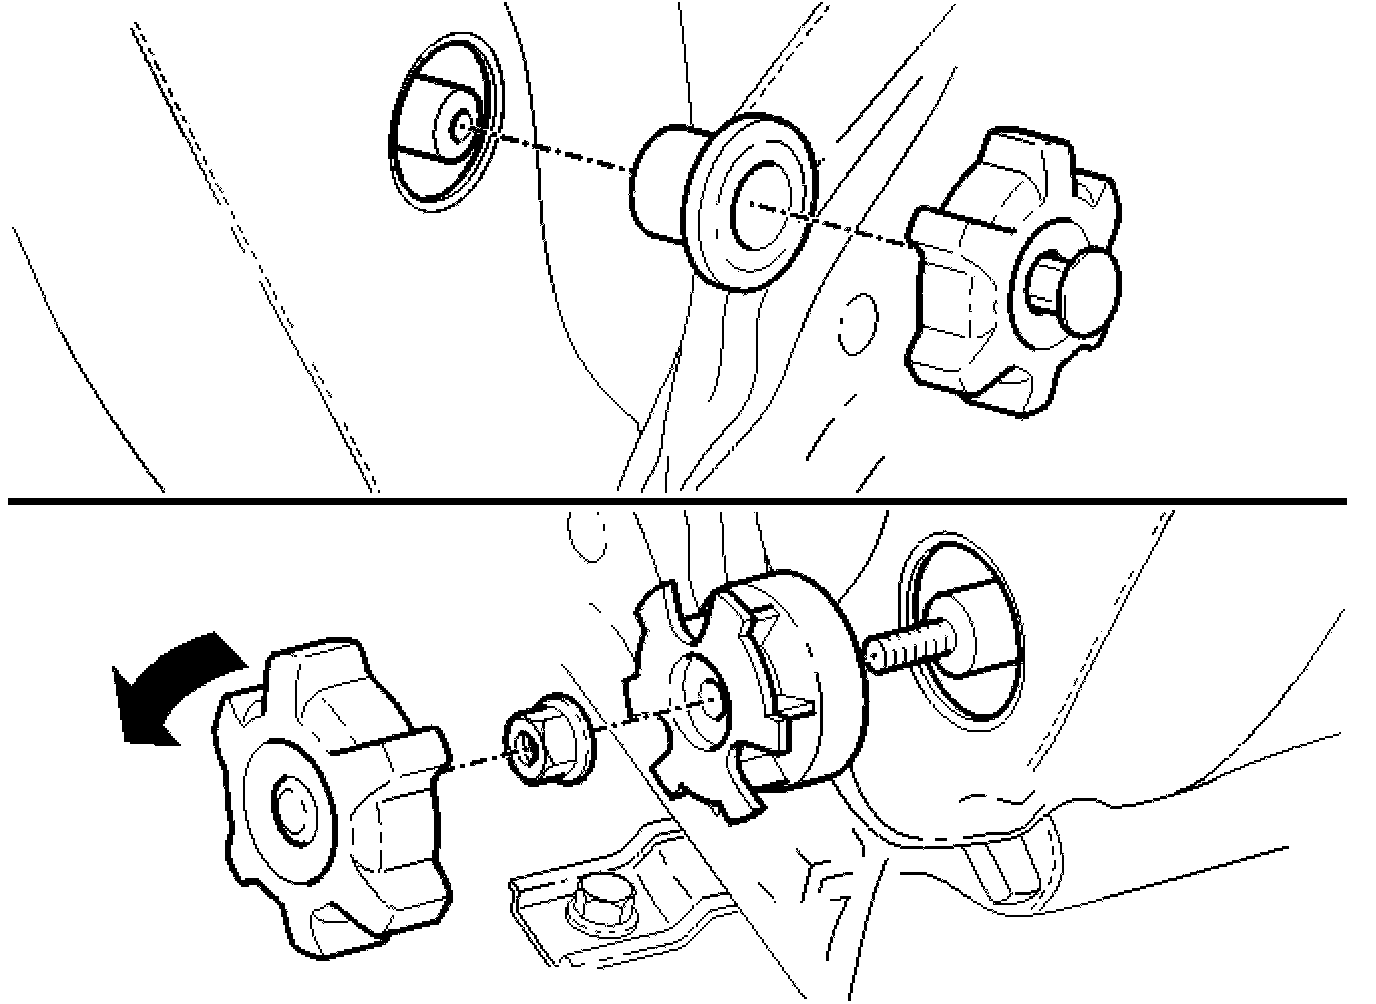
- Turn the knob counterclockwise as far as possible.
- Using some force, pull the knob outwards while turning it counter-clockwise.
- Remove the washer.
Removing The Adjustment Knob For The Backrest:
- Pull off the knob with a twisting movement.
- Remove the nut from the shaft.
- Remove the guide for the adjustment knob.
Removing Front Seat Head Restraints
Remove the head restraint.
Removing Backrest Upholstery
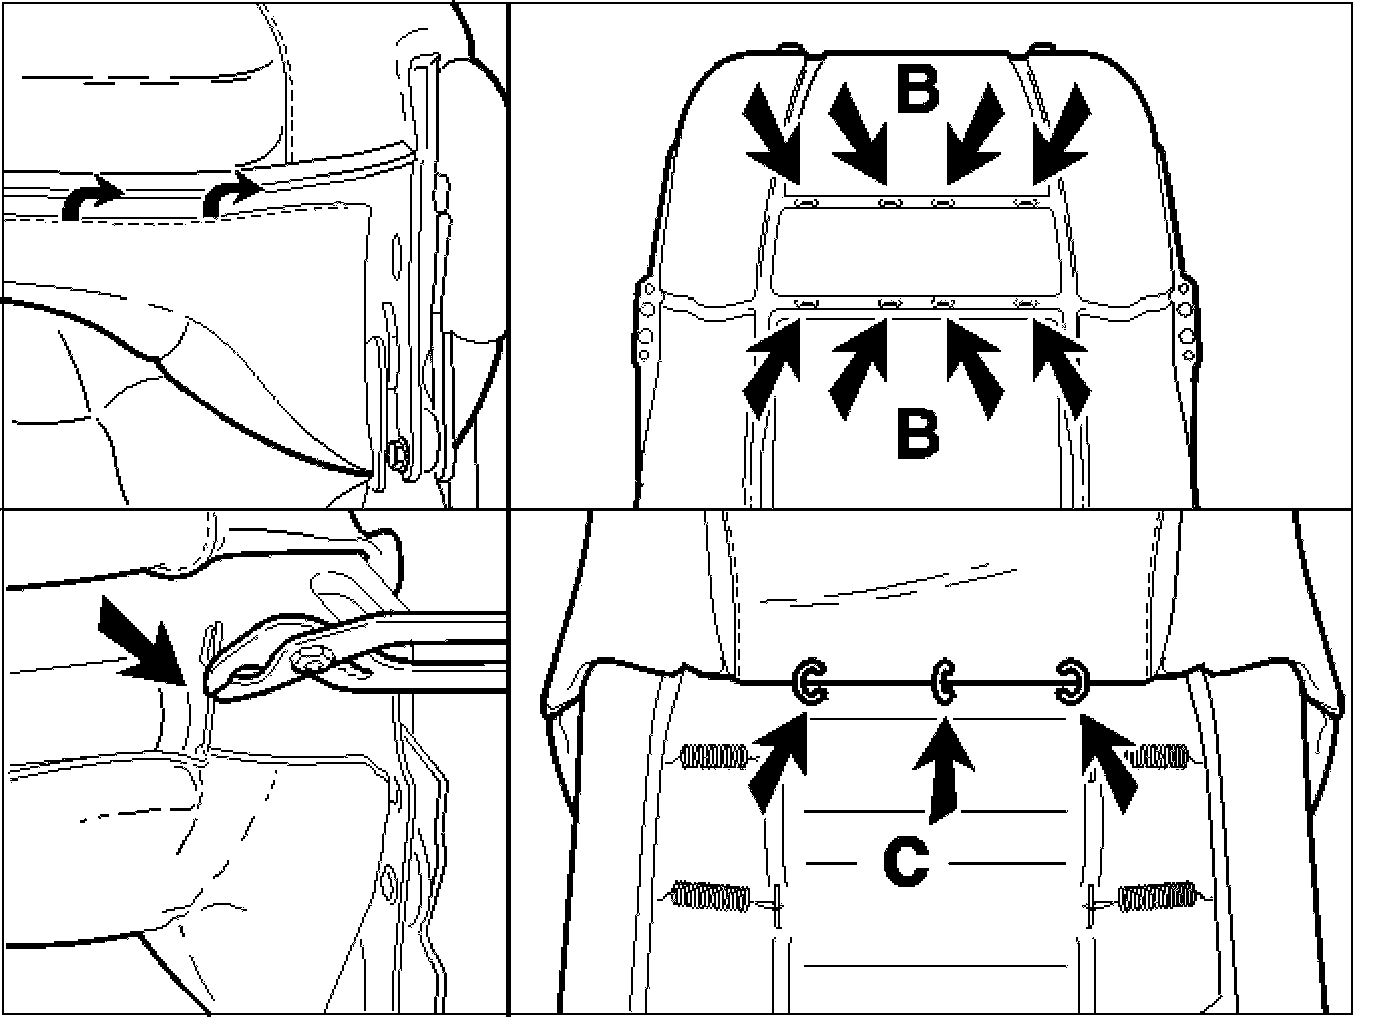
- Slide the locking pins upwards. Fold the backrest forward.
- Unhook the upholstery above the plastic panel from underneath (on both the left and righthand sides).
- Open the upholstery at the bottom.
- Gradually lift up the upholstery while unhooking it from the rear.
- Detach the upholstery from the padding.
Remove:
- the three clamps on the reverse (C)
- the eight clamps on the front (B)
- the 2 hooks on the inside reverse
- the 2 steel wires at the bottom edge of the plastic frame.
Remove the upholstery.
Removing The Plastic Plate From The Backrest Frame
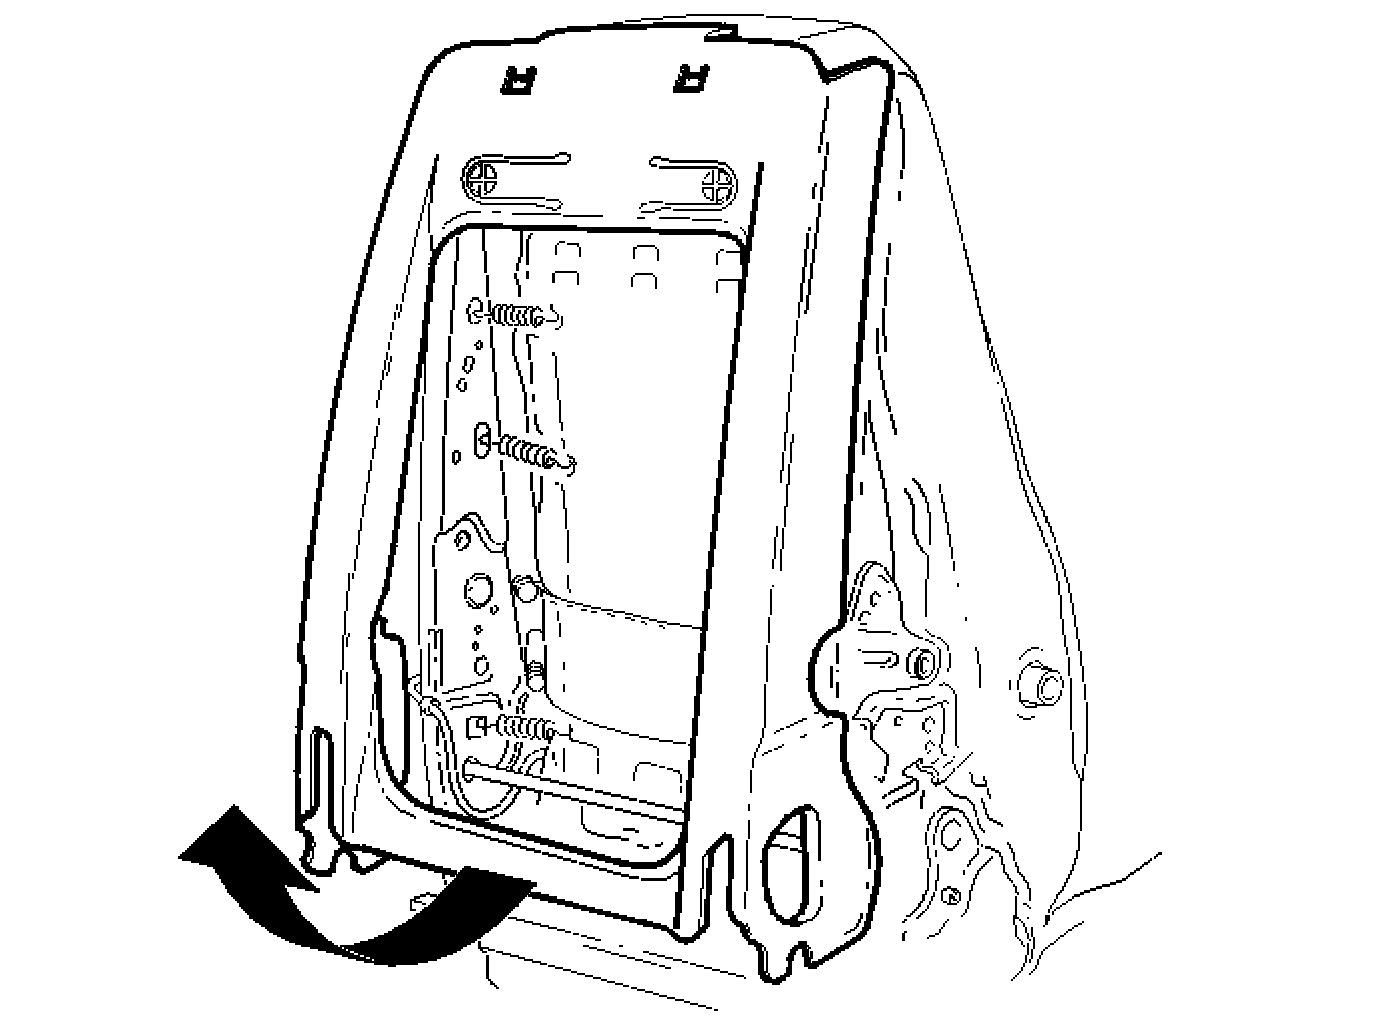
- Disconnect the plastic base from underneath.
- Pull the plastic frame upwards. Lift it over the adjustment shaft and remove it with a twisting movement.
Removing The SIPS Airbag From The Backrest
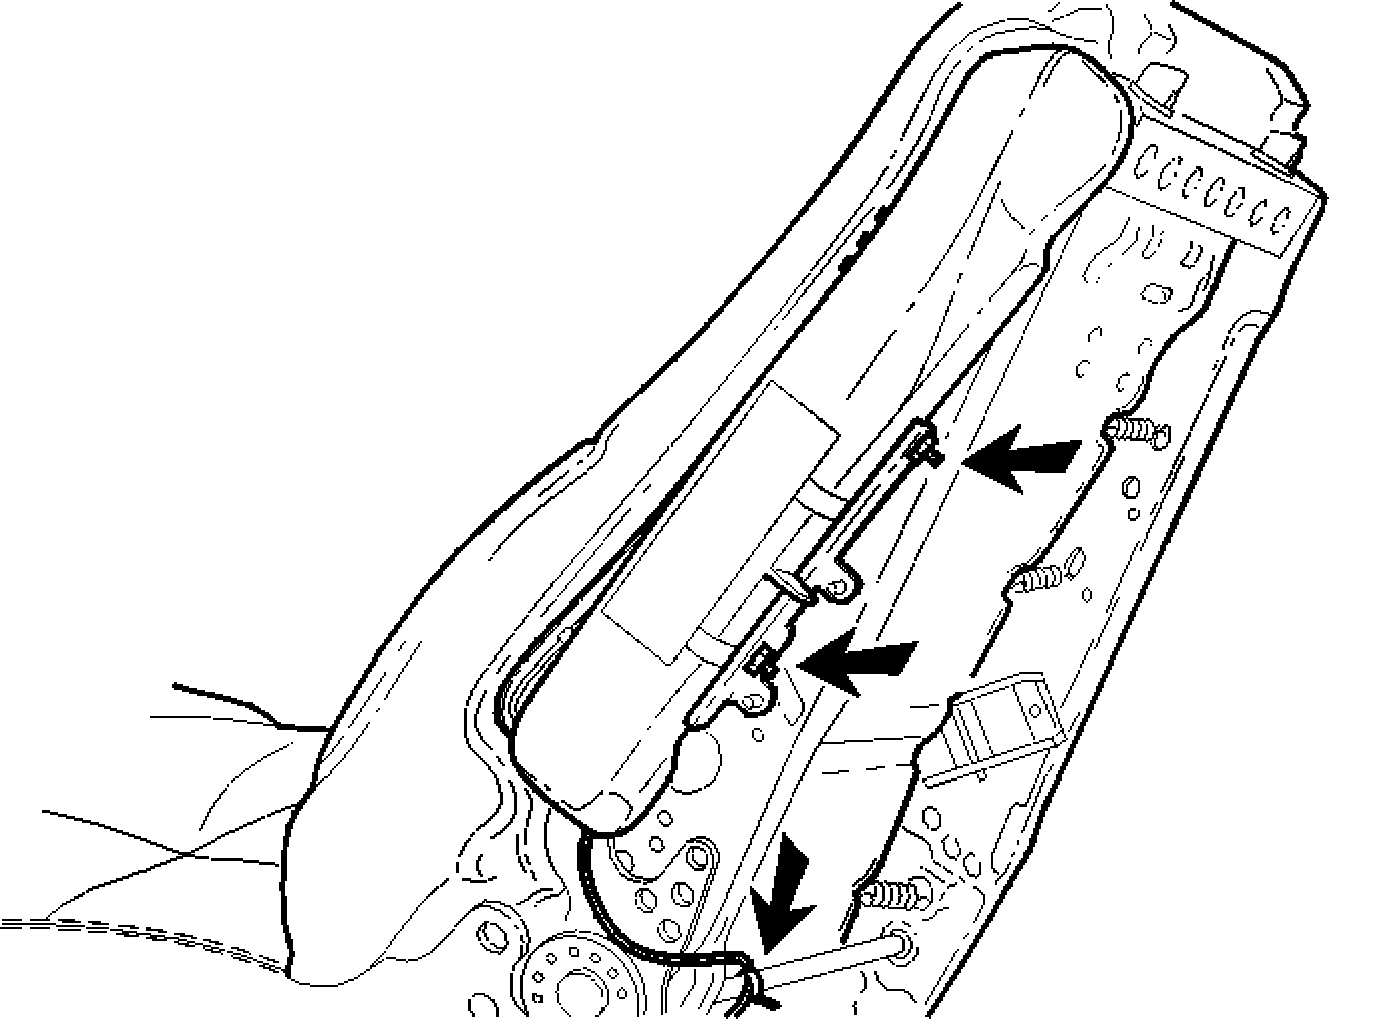
- Make a note of the routing of the SRS ignition cable and the location of the cable clips.
- Cut off the cable clips.
- Remove the 2 mounting screws from the inside. Remove the SIPS air bag from the front of the sub-frame.
- Disconnect the connector from the seat frame.
Removing The Backrest Padding
NOTE: Make a note of the position of the springs.
Unhook the 6 springs.
Remove the padding.
The Backrest And The Heater Pad:
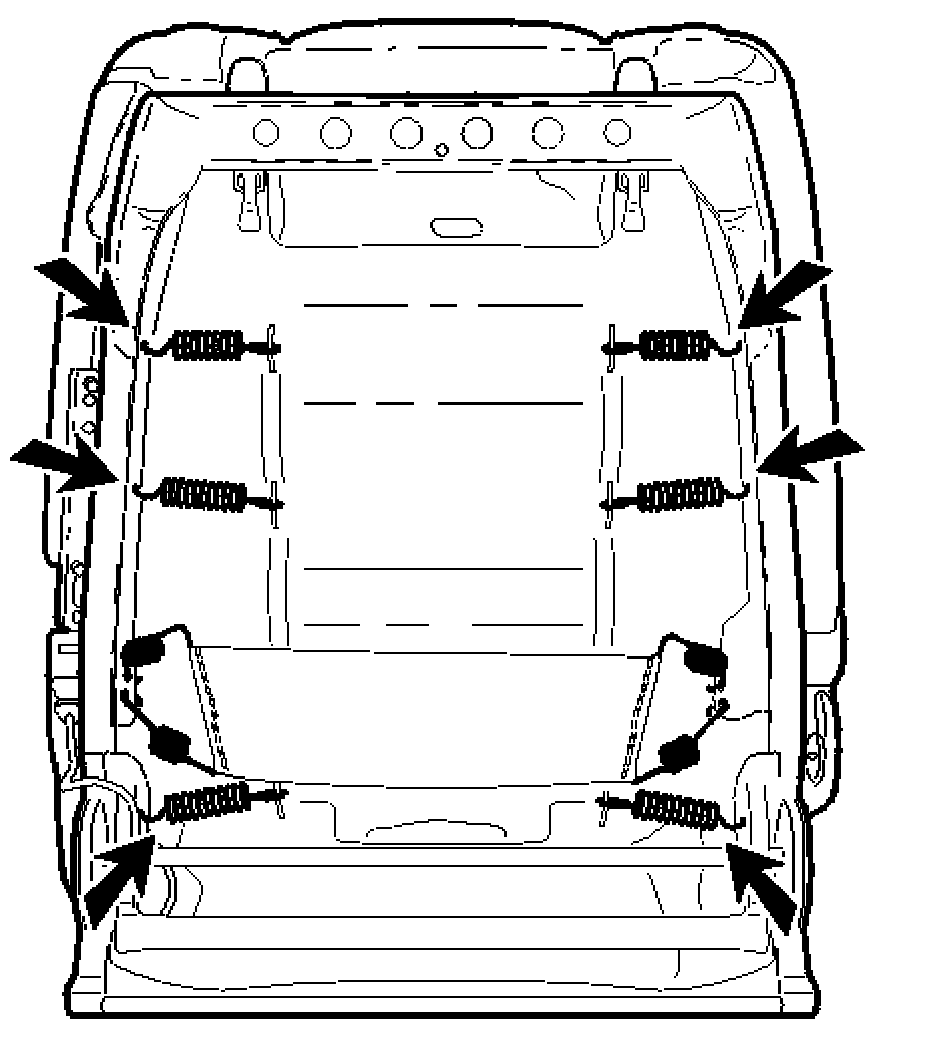
- Disconnect the connector.
- Remove the cable from the seat frame.
- Remove the heater pad.
Removing The Adjustable Lumbar Support
NOTE: The upholstery does not need to be completely removed.
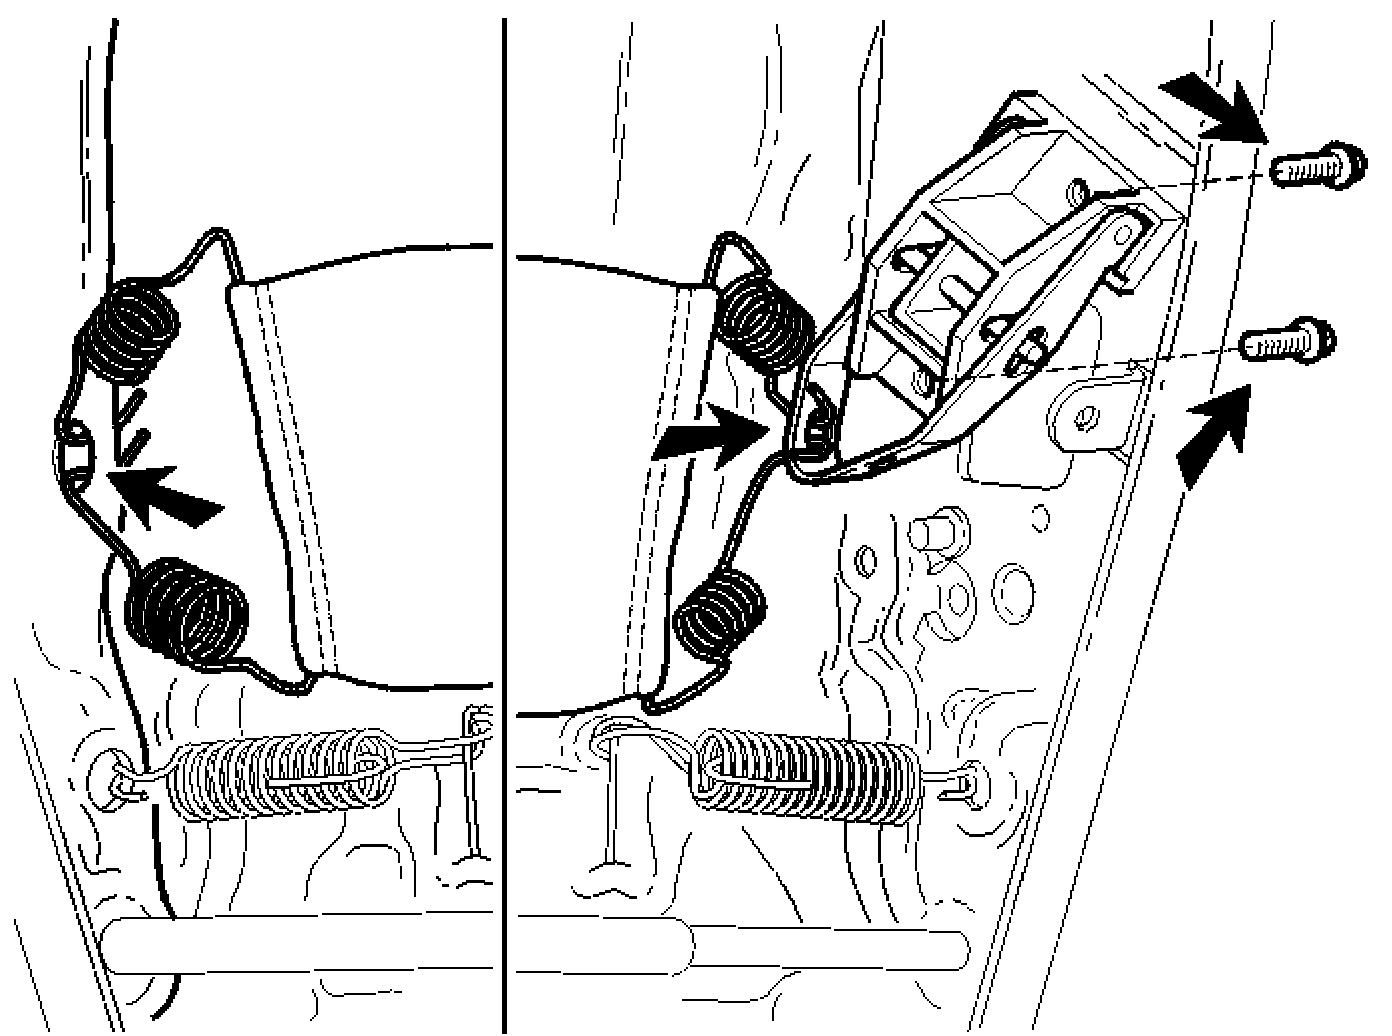
- Note the positions of the springs and the lumbar support.
- Remove the 2 screws. Remove the mechanism.
- Remove the lumbar strap.
Installing The Adjustable Lumbar Support
Hook the lumbar support into the springs in the correct position.
Position the mechanism. Secure with screws. Tighten to 5 Nm.
Installing The Backrest Padding
- Position the padding.
- Hook the springs into place.
With Heater Panel:
- Install the heater pad.
- Route and secure the cable.
- Connect the connectors.
Installing The SIPS Airbag On The Backrest
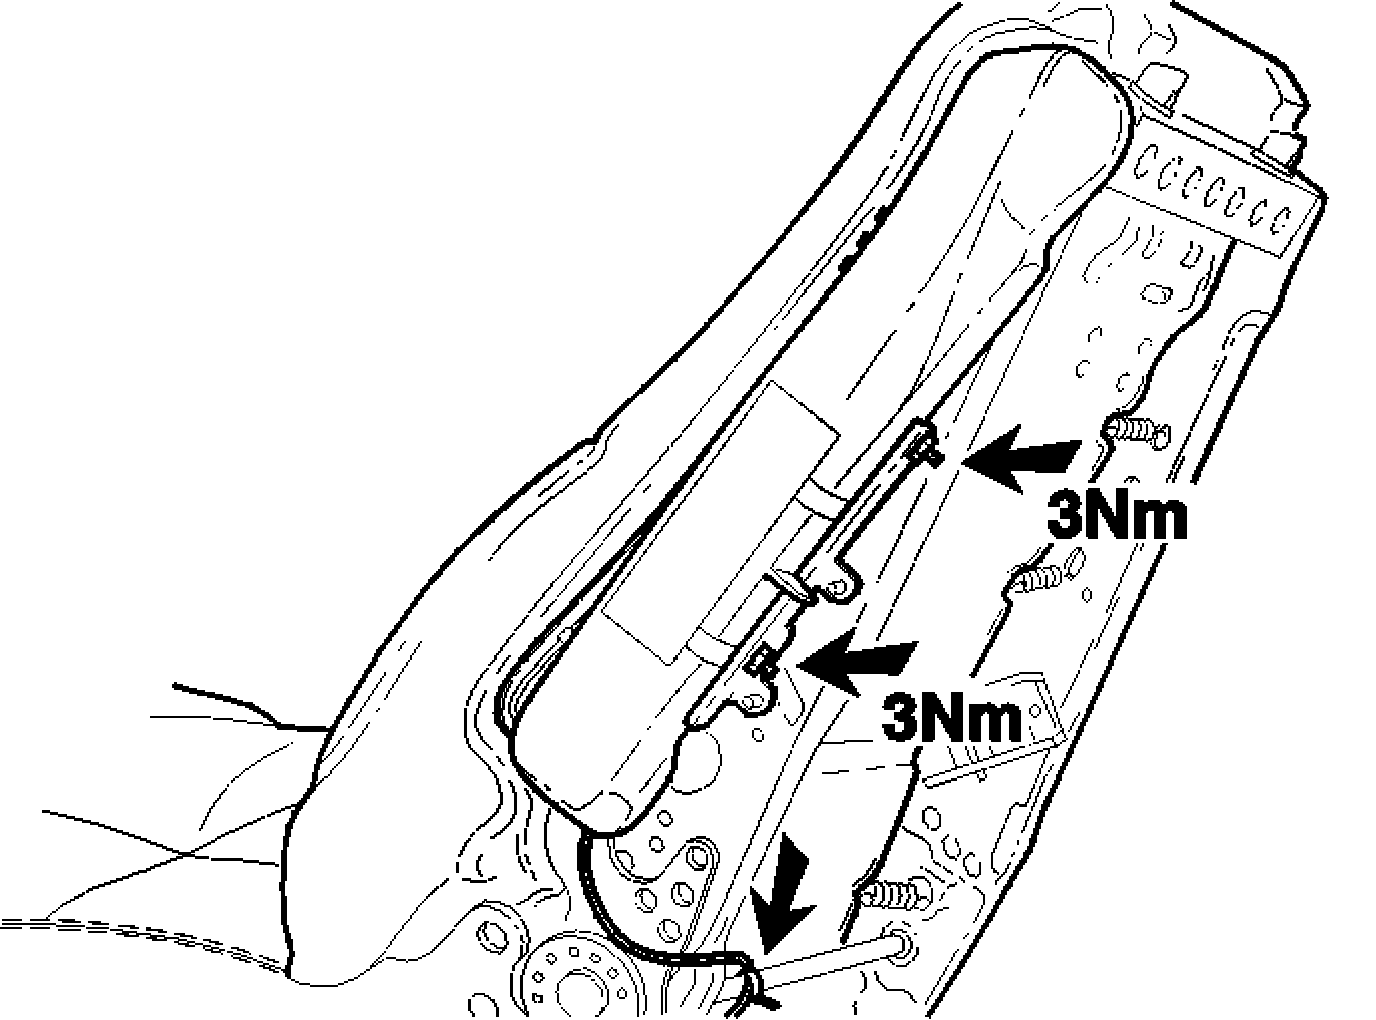
Position the SIPS air bag on the backrest frame.
CAUTION: The air bag mounting screws must be replaced if the SIPS air bag was deployed. The new screws must be of the same type and quality as the old.
NOTE: If the SIPS air bag has not activated.
- Connect the connector to the seat frame.
- Install the screws. Tighten to 3 Nm.
- Secure the SRS ignition cable on the support in its original position.
Installing The Plastic Plate In The Backrest Frame
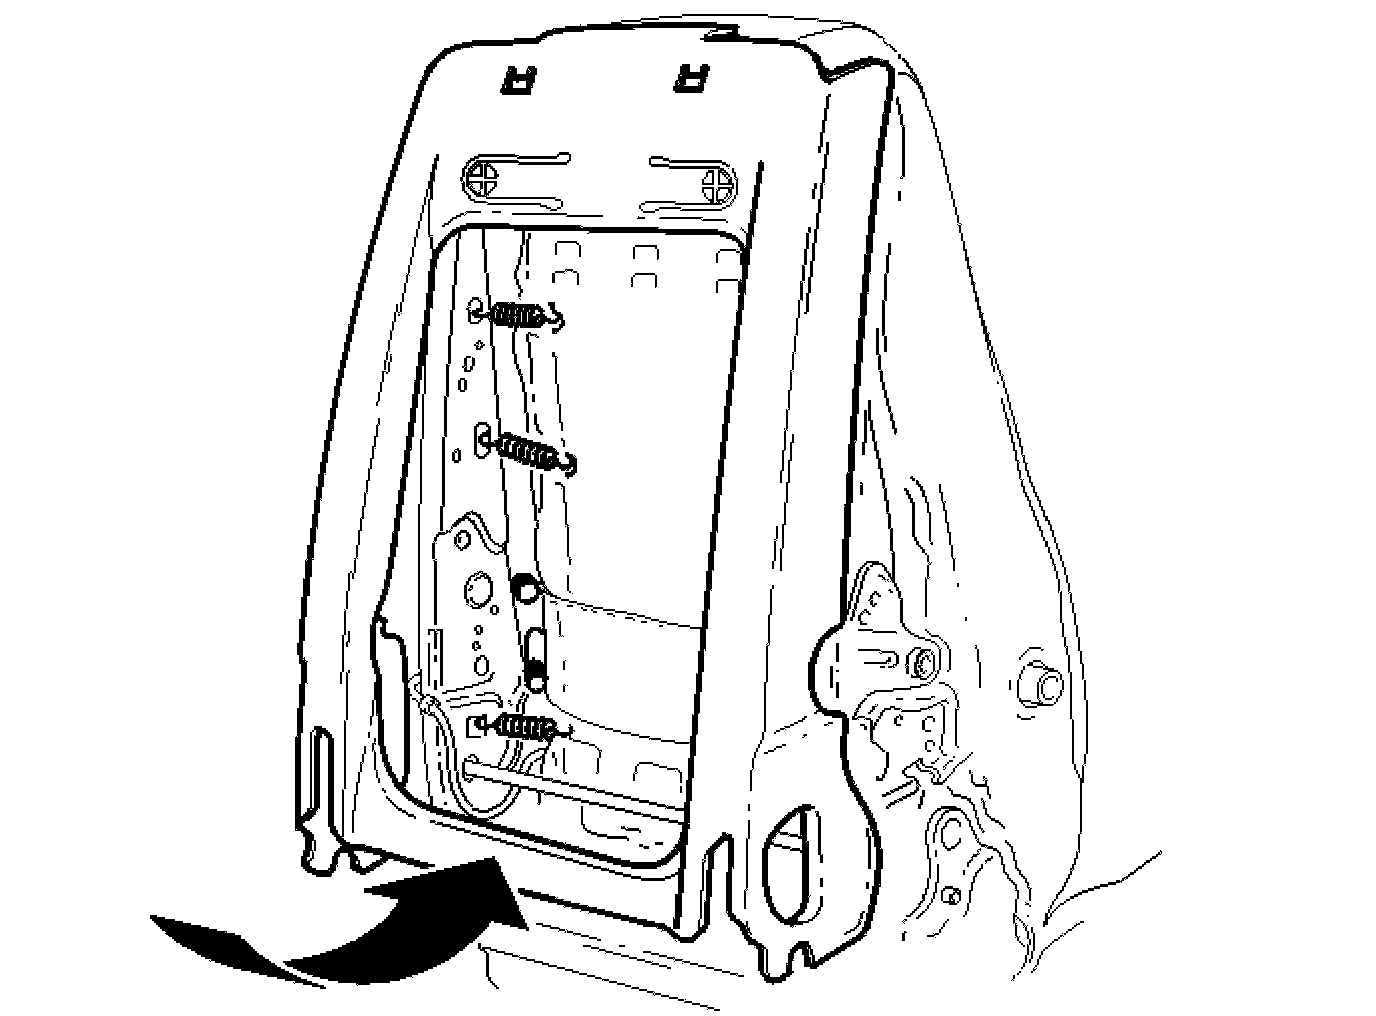
- Position the plastic frame along the top and pull downwards. Lift it over the adjustment axle and press into place.
- Position the padding for the seat in relation to the frame.
Installing The Backrest Upholstery
- Use special tool 115 8962 to secure the clamps.
NOTE: Only use Volvo Genuine parts or Volvo approved upholstery when replacing the backrest upholstery.
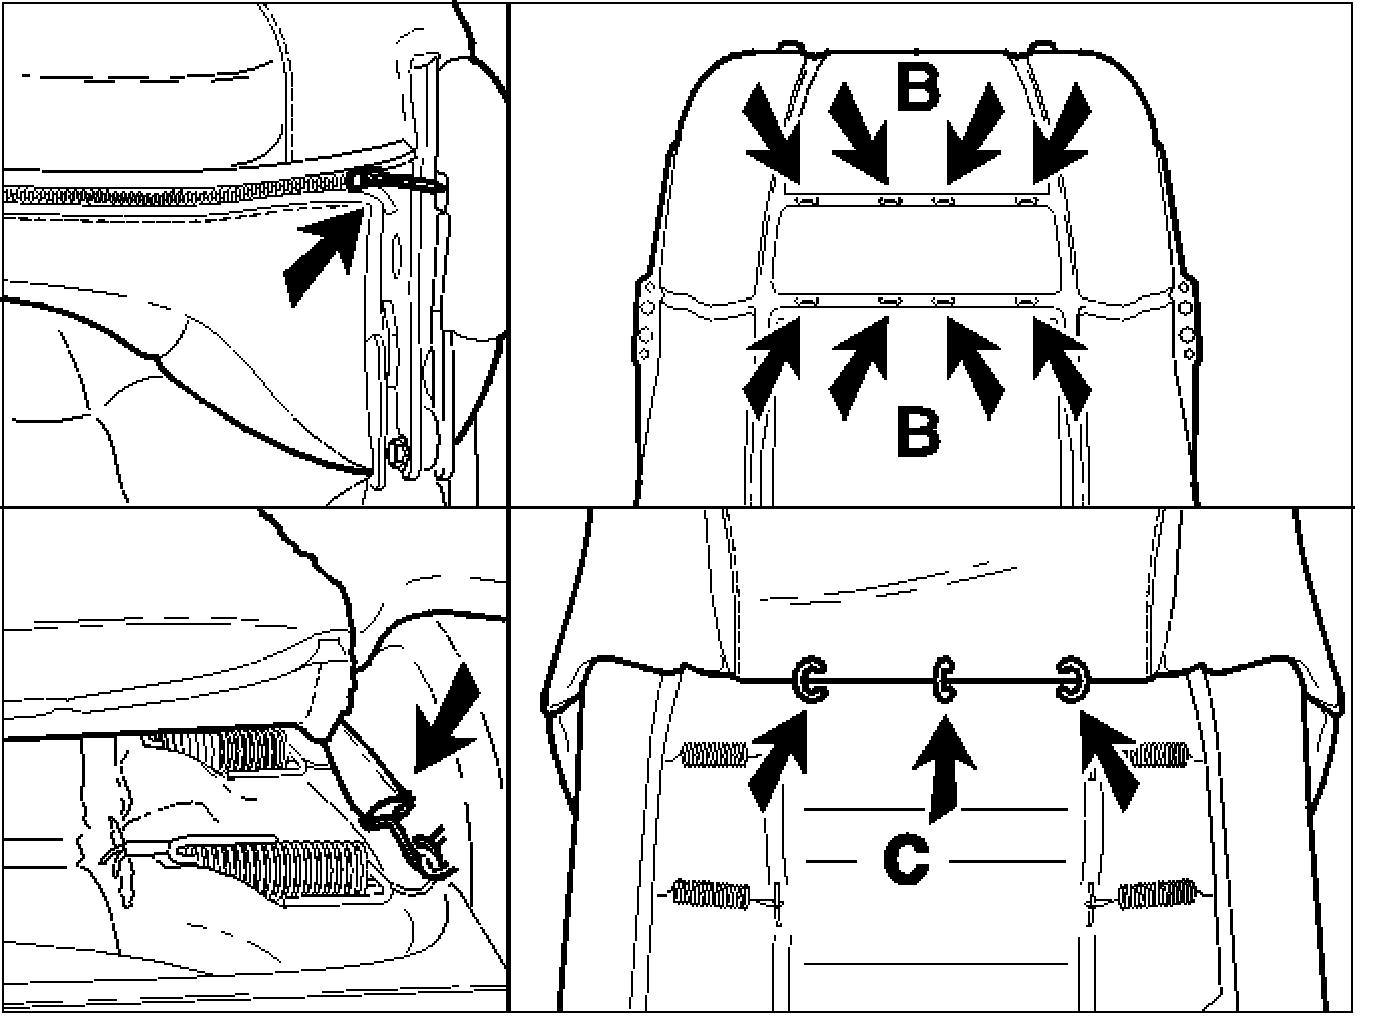
- Turn the upholstery inside out.
- Position the upholstery at the top.
- Secure the upholstery in the steel wires in the padding on the reverse. Use four clamps.
- Pull the upholstery over the frame. Secure the upholstery against the padding on the reverse. Use three clamps (B).
- Pull the upholstery down at the front. Secure the upholstery in the padding. Use four clamps.
Hook Into Place:
- the 2 hooks on the inside reverse
- the steel wires in the bottom edge of the plastic frame.
Pull the upholstery down further so that it is in position.
Lift up the lugs. Slide the backrest forward.
Install the upholstery over the plastic frame underneath.
Close the upholstery fully at the bottom.
Installing The Adjustments Knobs On The Seat
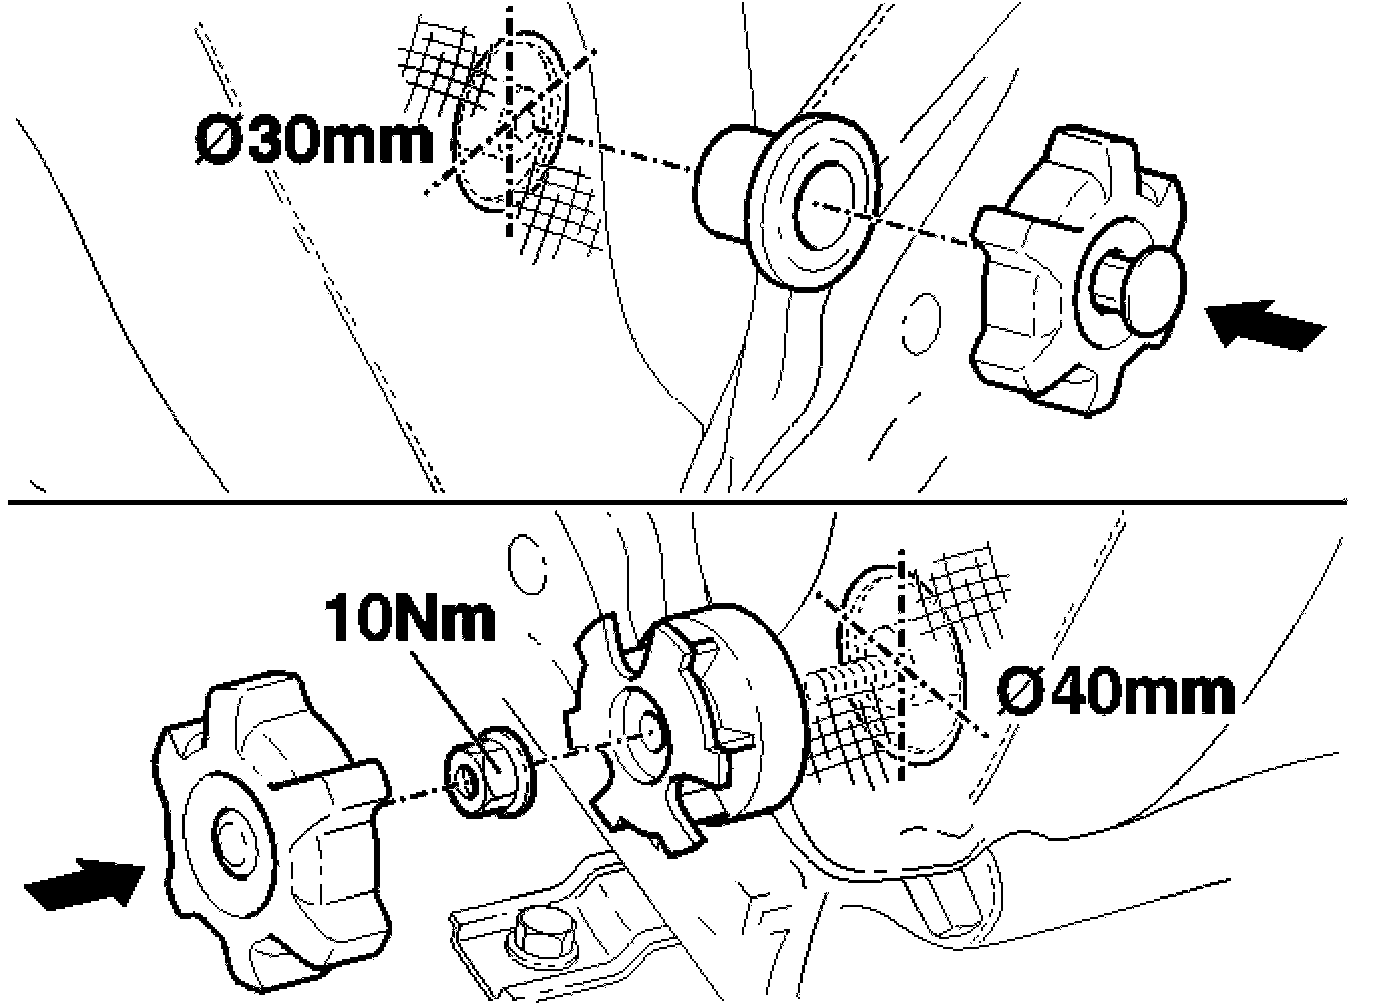
The Adjustment Knob For The Lumbar Support:
- If the upholstery is new: mark and cut a 30 mm diameter hole in the upholstery.
- Position the washer.
- Install the knob. Turn it clockwise until it engages heavily a second time.
- Check the function.
The Adjustment Knob For The Backrest:
- If the upholstery is new: mark and cut out a 40 mm diameter cross in the upholstery.
- Secure the shim on the shaft. Install the nut. Tighten to 10 Nm.
- Position the knob. Press the knob into place.
- Pull the knob to check that it is secure. Install the side panel.
Installing Head Restraints
Install the head restraint.
Installing The Front Seat
Install the front seat.