Ribbed Belt
Ribbed Belt
Special tools, testers and auxiliary items required
• Connecting Pin (T10027)
Removing
- Remove the noise insulation.
- Remove the right front wheel housing liner..
Risk of damaging due to a reversed running direction of a used ribbed belt:
• Before removing the ribbed belt, mark the running direction with chalk or felt-tip pen for reinstallation later.
- Install a box end wrench - 1 - on the belt tensioner bolt and rotate in the - direction of the arrow - far enough until the connecting pin (T10027) can be inserted in the tensioner roller.
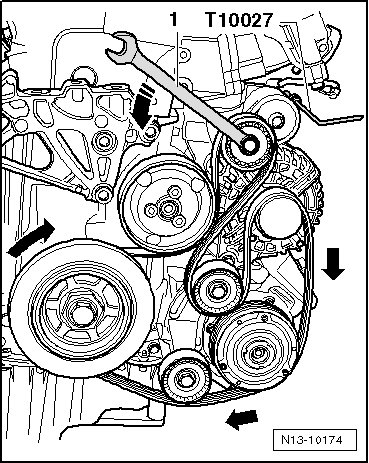
- Remove the ribbed belt.
Installing
• Make sure, before installing the ribbed belt, that all ancillaries (generator and Air Conditioning (A/C) compressor) are secured tightly.
• Make sure the idler rollers turn easily.
• The ribbed belt must not be kinked.
• Make sure the ribbed belt is routed correctly on the pulleys and check the rotation direction.
• For the belt routing, refer to => [ Ribbed Belt Drive Overview ] Ribbed Belt Drive Overview.
- Route the ribbed belt as shown.
- Rotate the belt tensioner using a box end wrench - 1 - in the - direction of the arrow - to relieve the tension on the connecting pin (T10027).
- Remove the connecting pin (T10027) from the tensioner roller.
After mounting the ribbed belt, start the engine and make sure the ribbed belt is running correctly.
- Install the right front wheel housing liner..
- Install the noise insulation.