Valvetrain Overview
Valvetrain Overview
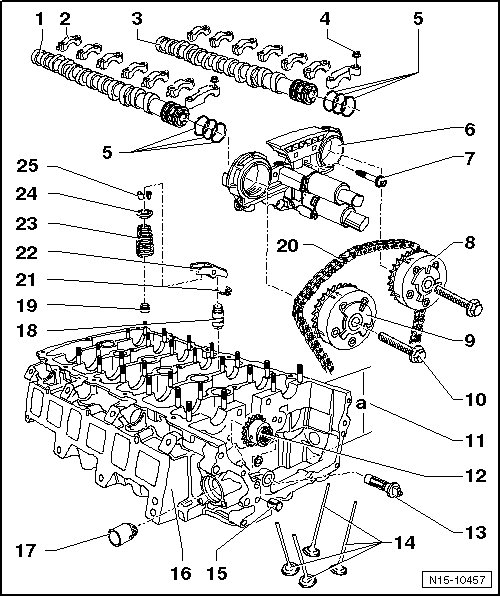
1 Intake Camshaft
• Check the radial clearance using Plastigage(R):
Wear limit: 0.1 mm
• Run out: maximum 0.01 mm
• Checking axial play, refer to => [ Camshaft Axial Clearance, Measuring ] Testing and Inspection.
• Identification, refer to => [ Camshaft Identification ] Application and ID.
• Removing and installing, refer to => [ Camshaft ] Service and Repair.
2 Camshaft Bearing Cap
• Installed position, refer to => [ Installed Position of the Camshaft Bearing Caps ] Service and Repair.
• Installation sequence, refer to => [ Intake Camshaft () ] Service and Repair.
3 Exhaust Camshaft
• Check the radial clearance using Plastigage(R):
Wear limit: 0.1 mm
• Run out: maximum 0.01 mm
• Checking axial play, refer to => [ Camshaft Axial Clearance, Measuring ] Testing and Inspection.
• Identification, refer to => [ Camshaft Identification ] Application and ID.
• Removing and installing, refer to => [ Camshaft ] Service and Repair.
4 Nut
• 5 Nm + an additional 45° (1/8) turn.
5 Seal
• If one seal is leaking, replace all 3.
• Coat the contact surfaces of the seals when installing the control housing.
• Do not spread the seals excessively when installing.
6 Control Housing
• Oil the contact surface of seals before installing.
• Camshaft adjustment valve removing and installing. Refer to => [ Camshaft Adjustment Valves N205/N318 ] Camshaft Adjustment Valves N205/N318.
• Marks for the valve timing, refer to => [ Marks on the Control Housing with FSI Engines ] Adjustments.
• Control housing overview. Refer to => [ Control Housing Overview ] Control Housing Overview.
• Check the control housing strainer for contaminants before installed. Refer to => [ Checking the Control Housing Strainer for Contaminants ] Control Housing Overview.
• Removing and installing, refer to => [ Camshaft ] Service and Repair.
7 Bolt
• 8 Nm + an additional 90° (1/4) turn.
• Install using the liquid locking fluid (D 000 600 A2).
8 Exhaust Camshaft Adjuster
• Identification: 32A
• Rotate the engine only with the camshaft adjuster and chain installed.
• Installing, refer to => [ Camshaft Adjuster ] Camshaft Adjuster.
9 Intake Camshaft Adjuster
• Identification: 24E
• Rotate the engine only with the camshaft adjuster and chain installed.
• Installing, refer to => [ Camshaft Adjuster ] Camshaft Adjuster.
10 Bolt
• 60 Nm + an additional 90° (1/4) turn.
• Always replace.
• The sensor wheel contact surface on the bolt head must be dry when installing.
• When removing and installing, counter hold the camshaft using a 27 mm open end wrench. Refer to => [ Camshaft ] Service and Repair.
11 Cylinder Head Height
• Minimum height: - a - = 139.9 mm
12 High Pressure Pump Sprocket
• With inner splines
• The drive shaft fits only in one position.
13 Drive Shaft
• The drive shaft fits only in one position.
• Oil the drive shaft before installing.
• For the vacuum pump.
14 Valves
• Exhaust valve are sodium filled.
• Do not grind, only hand lapping is permitted.
• Valve dimensions, refer to => [ Valve Dimensions ] [1][2]Specifications.
15 Alignment Bushing
16 Cylinder Head
• Checking for distortion, refer to => [ Checking the Cylinder Head for Distortion ] Cylinder Head and Cover Overview.
• Removing and installing, refer to => [ Cylinder Head ] Cylinder Head.
• Valve seat refacing. Refer to => [ Valve Seat, Refacing ] Service and Repair.
• After replacing, replace the entire amount of coolant.
17 Cam Follower
• Note the installed position, refer to => [ Installing ] High Pressure Pump.
18 Hydraulic Lash Adjuster
• Before installing, check camshaft axial play. Refer to => [ Camshaft Axial Clearance, Measuring ] Testing and Inspection.
• Do not interchange.
• With hydraulic valve clearance compensation.
19 Valve Stem Seal
• Replacing, refer to => [ Valve Stem Seal ] Service and Repair.
20 Camshaft Timing Chain
• Mark the direction of rotation before removing (installed position).
• Removing and installing, refer to => [ Camshaft Timing Chain ] Camshaft Timing Chain.
21 Clip
• Make sure it is secure.
22 Roller Rocker Arm
• Before installing, check the camshaft axial play. Refer to => [ Camshaft Axial Clearance, Measuring ] Testing and Inspection.
• Do not interchange.
• Check the roller for easy movement.
• Lubricate the contact surfaces.
• Use the clip to secure onto the hydraulic lash adjuster when installing.
23 Valve Spring
• Pay attention to the installed position.
• Removing and installing => [ Valve Stem Seal ] Service and Repair.
24 Valve Spring Retainer
25 Valve Retainer